


Hallo,
hier erkläre ich euch in ein paar Schritten, wie die Verarbeitung meiner Schildaufkleber funktioniert
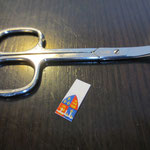
Bild 1 Material: Schildbogen, Plastikfigur, Schere , Nagelschere (für die Rundungen) Skalpell, runder Bleistift und Bastelpappe (hier gibt es diverse Varianten selbst eine Miralculi Packung würde passen :-) In einem gut sortierten Bastelgeschäft kann man bereits Pappe mit Holzdesign kaufen
das würde einen Schritt weniger in der Anleitung machen sofern man ein Holzschild verarbeitet.
Bild 2 Figuren
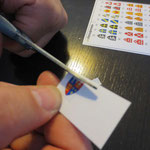
Bild 3 entferne mit hilfe eines SCHARFEN Skalpells das Originalschild
Bild 4 Figur ohne Schild
Bild 5 Schneidet das Wunschschild aus (Wenn man eine ganze Einheit bearbeitet, kann man natürlich den kompletten Schildbogen aufkleben )
Bild 6 Aufkleben des Schildaufklebers auf die Bastelpappe
Bild 7-9 Ausschneiden des Schildes (Glatte Kanten mit einer Schere Empfohlen wird die Rundungen mit einer Nagelschere zu schneiden)
Bild 10 "Fast" fertiges Schild
Bild 11 Das Schild "auf Wunsch" über einen Runden Bleistift rollen somit erhält das Schild seine typische leichte Rundung
Bild 12 Bemalung der Rückseite in Holz oder Metalloptik je nachdem was man braucht
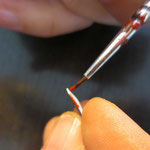
Bild 13 Bemalung der Weißen Sichtkante in der passenden Farbe des Schildes
Bild 14 Endergebniss.... Ab in die Schlacht
Als Empfehlung für die Lange Haltbarkeit macht ein Klaarlack auf dem Schild Sinn ! Revell Nr.0
somit sehen die Schilde auch nach Jahren noch Top aus
Hello,
Here I'll explain in a few steps, how to
work with my Shield Sticker
Image 1 material: Shield sheet, plastic figure, scissors, nail scissors (for rounding) scalpel, round pencil and craft board (there are several variants
even a Miralculi pack would fit :-)
In a well-stocked craft store, you can already buy cardboard with
wood design
that would make a move less in the manual if you processed a wooden sign.
Image 2 figures
Image 3 Cut of and removed the Original Shield with the help of a scalpel from the Miniatur
Image 4 Figure without the Shield
Image 5 Cut of Shield from the Sheet (If you edit a whole unit, of course you can use the complete Shield Sheet)
Image 6 sticking the Shield sticker on the
cardboard crafts
Image 7-9 Cut of the shield (Smooth
edges is recommended with a pair of scissors to cut the curves with a nail scissors)
Image 10 "Almost" finished plate
Image 11 Roll the shield "on demand" on
a round pencil this receives the Shield with the typical
light curve
Image 12 Paint the back of the Shield wood
or metal look depending on what you need
Image 13 Paint the edge odf the Shields in Colour of the shield ,then let dry
the Shield
Image 14 Glue the Shield on the Figur / Final result.... Go to the Battlefield
**NEW**NEW**NEW**
25.06.2025
neue bemalte 54mm Napoleon Figuren
07.06.2025
neue bemalte 54mm Indianer & Schottische Ritter
02.06.2025
neue bemalte 54mm Napoleon Figuren
01.05.2025
neue bemalte 70mm Figuren passend zu Elastolin & 54mm ACW
28.04.2025
neue bemalte Figuren 54mm Wild West 23.04.2025
neue bemalte 54mm Figuren AWI / FIW
**NEW**NEW**NEW**
25.06.2025
new painted 54mm Napoleonics
07.06.2025
new painted 54mm Wild West Indians & Scottish Knights
02.06.2025
new painted 54mm Napoleonic Figures
01.05.2025
new painted 70mm Figures fits to Elastolin & 54mm ACW
28.04.2025
new painted 54mm Wild West Figures
23.04.2025
new painted 54mm Figures AWI / FIW